| Table of Contents |
|---|
Introduction
| English |
|---|
Usually, we design a process to solve the main business problem, like in the example shown below. We exclude explicit tools for sending out email notifications to avoid complicating the process flow design. The User Notification plugin is used to address this issue. |
| Thai |
|---|
บทนำ
ใช้ User Notification ผู้ใช้เพื่อแก้ไขปัญหานี้ |
Figure 1: Typical Process Design Flow
| Thai |
|---|
รูปที่ 1: โฟลว์การออกแบบกระบวนการทั่วไป |
Setting Up the User Notification Plugin
| Thai |
|---|
การตั้งค่าปลั๊กอินการแจ้งเตือนผู้ใช้ |
Go to Properties and Export in your app.
Thai ไปที่ Properties and Export ในแอปของคุณ
Go to Set Plugin Default Properties.
Thai ไปที่ Set Plugin Default Properties
Select User Notification.
Thai เลือกการแจ้งเตือนผู้ใช้
In
the Configure User Notificationthe SMTP Settings tab, configure the email server as required. Sometimes, using gmail might cause problems such as not being able to send email. In that case, if one still insists in using gmail, they may opt to set up an app generated password instead of using the gmail password, or swap to using hotmail instead. The Host for hotmail is smtp-mail.outlook.com , the Port is 587 , the Security is TLS .
Thai ในแท็บกำหนดค่าการแจ้งเตือนผู้ใช้ให้กำหนดค่าเซิร์ฟเวอร์อีเมลตามต้องการ
In the Configure User Notification
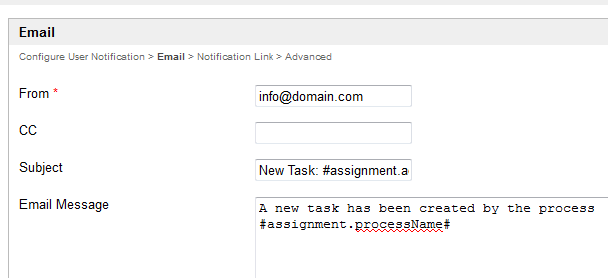
In the Emailtab, customize your email template as needed. It should be a generic email template as it will be used for all activities under your app.
Thai ในแท็บอีเมลกำหนดแม่แบบอีเมลของคุณตามต้องการ ควรเป็นเทมเพลตอีเมลทั่วไปที่จะใช้สำหรับกิจกรรมทั้งหมดที่อยู่ในแอพของคุณ
- In
Under the Notification Link
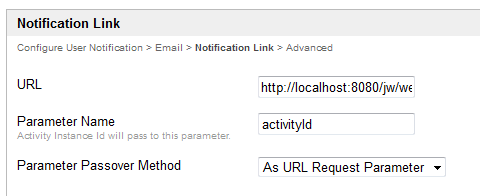
tabsection, define the assignment link that will be shown at the end of the email message.
Thai ในแท็บลิงก์การแจ้งเตือนให้กำหนดลิงค์การมอบหมายที่จะปรากฏที่ส่วนท้ายของข้อความอีเมล
Link to Userview Inbox
If you want to link it to your Userview Inbox, get the absolute URL to the inbox and key it in the URL field. Type "activityId" in the Parameter Name field and choose "As URL Request Parameter" in the Parameter Passover Method select box.Thai เชื่อมโยงไปยังกล่องจดหมายเข้าของ Userview
หากคุณต้องการเชื่อมโยงไปยัง Userview Inbox ของคุณให้รับ URL สัมบูรณ์ไปยังกล่องจดหมายและใส่ไว้ในช่อง URL พิมพ์ "activityId" ในฟิลด์ชื่อพารามิเตอร์และเลือก "เป็นพารามิเตอร์คำขอ URL" ในกล่องเลือกวิธีการส่งผ่านพารามิเตอร์In the last tab, you may select activities that you would like to exclude from Task Notification.
Thai ในแท็บสุดท้ายคุณสามารถเลือกกิจกรรมที่คุณต้องการแยกออกจากการแจ้งเตือนงาน
Note: The User Notification plugin is designed for all activities in an app and not just for a selected few, but only one User Notification plugin can be configured per app. Nevertheless, it is possible for you to manually handle the notification for a specific activity by placing a tool after that activity in your process design, and then excluding it in the Activity Exclusion list in the User Notification plugin.
| Thai |
|---|
หมายเหตุ: ปลั๊กอินการแจ้งเตือนผู้ใช้ถูกออกแบบมาสำหรับกิจกรรมทั้งหมดในแอพและไม่เพียง แต่สำหรับปลั๊กอินบางประเภทเท่านั้น แต่สามารถกำหนดค่าปลั๊กอินการแจ้งเตือนผู้ใช้ได้เพียงหนึ่งแอปเท่านั้นต่อแอป อย่างไรก็ตามคุณสามารถจัดการการแจ้งเตือนสำหรับกิจกรรมเฉพาะด้วยตนเองโดยวางเครื่องมือหลังจากกิจกรรมนั้นในการออกแบบกระบวนการของคุณแล้วแยกออกจากรายการการยกเว้นกิจกรรมในปลั๊กอินการแจ้งเตือนผู้ใช้ |
Related Documentation
| Thai |
|---|
เอกสารที่เกี่ยวข้อง |


